Events/2020/Holiday: Difference between revisions
No edit summary |
mNo edit summary |
||
| (16 intermediate revisions by the same user not shown) | |||
| Line 1: | Line 1: | ||
Due to COVID, Hacksburg's annual Holiday Ornament Class was entirely online, with kits and cards made available to order in advance. Following are information on and instructions for the various items available. All designs are original creations by Hacksburg members, produced at Hacksburg using our 80W CO2 laser cutter, and assembled by Hacksburg volunteers. | |||
== Gingerbread Person or Reindeer | == 2020 Custom Laser-Cut Wooden Snowflake Card and Ornament == | ||
<blockquote><span style="font-size:75%">Laser-cut wood snowflake card and ornament Copyright ©️ James R. Dunson 2018-2020. [[File:Cc-by-nc-sa-88x31.png|link=https://creativecommons.org/licenses/by-nc-sa/4.0]] Licensed under CC BY-NC-SA 4.0, with specific additional permissions granted to Hacksburg to use for fundraising. To view a copy of this license, visit https://creativecommons.org/licenses/by-nc-sa/4.0</span></blockquote> | |||
[[File:Snowcard-2020.jpg|160px|border|left|2020 laser-cut wooden snowflake card and ornament]] | |||
<br clear=all> | |||
New 2020 snowflake design. The bottom "Hacksburg and Friends" text would be replaced with the user-specified custom name or message. Card and ornament fits in most standard 4" x 6" envelopes; additional postage may be required (e.g. surcharge for "rigid" mail pieces). | |||
== Laser-Cut Felt Gingerbread Person or Reindeer Ornament Kit == | |||
<blockquote><span style="font-size:75%">Laser-cut felt Gingerbread Person or Reindeer ornament Copyright ©️ James R. Dunson 2018-2020. [[File:Cc-by-nc-sa-88x31.png|link=https://creativecommons.org/licenses/by-nc-sa/4.0]] Licensed under CC BY-NC-SA 4.0, with specific additional permissions granted to Hacksburg to use for fundraising. To view a copy of this license, visit https://creativecommons.org/licenses/by-nc-sa/4.0</span></blockquote> | |||
[[File:Gingerbread-reindeer.jpg|160px|border|left|simple finished gingerbread person and reindeer ornament options]] | [[File:Gingerbread-reindeer.jpg|160px|border|left|simple finished gingerbread person and reindeer ornament options]] | ||
<br clear=all> | <br clear=all> | ||
| Line 13: | Line 20: | ||
* craft sticks to aid in gluing and stuffing | * craft sticks to aid in gluing and stuffing | ||
* cotton balls for stuffing | * cotton balls for stuffing | ||
* kid-safe, washable glue | * kid-safe, washable glue (may not be included in mailed kits; Tacky Glue or ordinary white school glue is recommended) | ||
Basic instructions for either option: | Basic instructions for either option: | ||
| Line 31: | Line 38: | ||
* Tie a knot at the top | * Tie a knot at the top | ||
* Using the excess yarn, form a hanging loop, and tie a knot to finish it off. Trim any excess yarn. | * Using the excess yarn, form a hanging loop, and tie a knot to finish it off. Trim any excess yarn. | ||
[[File:Gingerbread-reindeer-plain.jpg|160px|border|left|gingerbread person and reindeer ornament options before decorating]] | [[File:Gingerbread-reindeer-plain.jpg|160px|border|left|assembled gingerbread person and reindeer ornament options before decorating]] | ||
<br clear=all> | <br clear=all> | ||
* Decorate by gluing on the various colors and shapes of laser-cut felt as you see fit. See the picture below for ideas. You may want to lay out your design to test it out before gluing. | * Decorate by gluing on the various colors and shapes of laser-cut felt as you see fit. See the picture below for ideas. You may want to lay out your design to test it out before gluing. | ||
| Line 37: | Line 44: | ||
<br clear=all> | <br clear=all> | ||
== Christmas Tree Kit == | == Laser-Cut Felt Christmas Tree Ornament Kit == | ||
<blockquote><span style="font-size:75%">Laser-cut felt Christmas Tree ornament Copyright ©️ James R. Dunson 2018-2020. [[File:Cc-by-nc-sa-88x31.png|link=https://creativecommons.org/licenses/by-nc-sa/4.0]] Licensed under CC BY-NC-SA 4.0, with specific additional permissions granted to Hacksburg to use for fundraising. To view a copy of this license, visit https://creativecommons.org/licenses/by-nc-sa/4.0</span></blockquote> | |||
[[File:Tree-three-finished.jpg|160px|border|left|three example tree ornaments, 2018]] | |||
<br clear=all> | |||
The typical 2020 Christmas Tree Felt Ornament kit includes: | The typical 2020 Christmas Tree Felt Ornament kit includes: | ||
| Line 46: | Line 56: | ||
* craft sticks to aid in gluing and stuffing | * craft sticks to aid in gluing and stuffing | ||
* cotton balls for stuffing | * cotton balls for stuffing | ||
* kid-safe, washable glue | * kid-safe, washable glue (may not be included in mailed kits; Tacky Glue or ordinary white school glue is recommended) | ||
Basic instructions for the default look, a decorated Christmas tree: | Basic instructions for the default look, a decorated Christmas tree: | ||
| Line 63: | Line 73: | ||
* Tie a knot at the top | * Tie a knot at the top | ||
* Using the excess yarn, form a hanging loop, and tie a knot to finish it off. Trim any excess yarn. | * Using the excess yarn, form a hanging loop, and tie a knot to finish it off. Trim any excess yarn. | ||
[[File:Tree-plain.jpg|160px|border|left|assembled tree before decorating]] | |||
<br clear=all> | |||
* Decorate by gluing on the various colors and shapes of laser-cut felt as you see fit. See the picture(s) below for ideas. You may want to lay out your design to test it out before gluing. | * Decorate by gluing on the various colors and shapes of laser-cut felt as you see fit. See the picture(s) below for ideas. You may want to lay out your design to test it out before gluing. | ||
** (Note: pictured trees are from a previous year's kit, and may be | ** (Note: pictured trees are from a previous year's kit, and may be decorated with different parts and/or colors than are available in the current kit.) | ||
[[File:Tree-three-finished.jpg|160px|border|left| | [[File:Tree-three-finished.jpg|160px|border|left|three example tree ornaments, 2018]] | ||
<br clear=all> | <br clear=all> | ||
== Wreath Kit == | == Laser-Cut Felt Wreath Kit == | ||
[[File:Wreath-06-berries.jpg|160px|border|left|wreath | <blockquote><span style="font-size:75%">Laser-cut felt Wreath Copyright ©️ James R. Dunson 2018-2020. [[File:Cc-by-nc-sa-88x31.png|link=https://creativecommons.org/licenses/by-nc-sa/4.0]] Licensed under CC BY-NC-SA 4.0, with specific additional permissions granted to Hacksburg to use for fundraising. To view a copy of this license, visit https://creativecommons.org/licenses/by-nc-sa/4.0</span></blockquote> | ||
[[File:Wreath-06-berries.jpg|160px|border|left|finished wreath]] | |||
<br clear=all> | <br clear=all> | ||
| Line 78: | Line 92: | ||
* laser-cut red felt "bow" shape | * laser-cut red felt "bow" shape | ||
* craft sticks to aid in gluing | * craft sticks to aid in gluing | ||
* kid-safe, washable glue | * kid-safe, washable glue (may not be included in mailed kits; Tacky Glue or ordinary white school glue is recommended) | ||
Basic instructions for the default look, a fairly symmetrical holly wreath: | Basic instructions for the default look, a fairly symmetrical holly wreath: | ||
| Line 84: | Line 98: | ||
* Set up a work space for gluing; with old cardboard, newspapers, wax paper, or something to avoid getting glue on the furniture | * Set up a work space for gluing; with old cardboard, newspapers, wax paper, or something to avoid getting glue on the furniture | ||
* Carefully separate out the various parts from the bag | * Carefully separate out the various parts from the bag | ||
* Glue the 3 rings on top of each other, lining up the slot to match, and being generous with the glue. | * Glue the 3 rings on top of each other to produce a 3-layer laminated ring, lining up the slot to match, and being generous with the glue. | ||
** If using white glue, put a thin bead around just inside the inside and and outside edge of the ring, and then a zigzag of glue between them | |||
** (Note: optionally, spray-type craft adhesive (not supplied) may be used to laminate the rings; follow instructions on can, with adult supervision and a well-ventilated working area required) | |||
* (Consider the top with the slot to be "North" for purposes of the following directions) | * (Consider the top with the slot to be "North" for purposes of the following directions) | ||
* Take 4 leaves, and glue them on top of the ring, at N, S, E, W points, with the longer axis of the leaves pointing radially, and roughly centered on the ring. Make sure the N leaf is not glued in such a way as to cover the hanging slot. | * Take 4 leaves, and glue them on top of the ring, at N, S, E, W points, with the longer axis of the leaves pointing radially, and roughly centered on the ring. Make sure the N leaf is not glued in such a way as to cover the hanging slot. | ||
| Line 104: | Line 120: | ||
[[File:Wreath-06-berries.jpg|160px|border|left|wreath with berries applied]] | [[File:Wreath-06-berries.jpg|160px|border|left|wreath with berries applied]] | ||
<br clear=all> | <br clear=all> | ||
== Previous Years == | |||
[[Events/2019/Holiday_Ornaments|2019 Holiday Ornaments]] | |||
Latest revision as of 22:20, 23 December 2020
Due to COVID, Hacksburg's annual Holiday Ornament Class was entirely online, with kits and cards made available to order in advance. Following are information on and instructions for the various items available. All designs are original creations by Hacksburg members, produced at Hacksburg using our 80W CO2 laser cutter, and assembled by Hacksburg volunteers.
2020 Custom Laser-Cut Wooden Snowflake Card and Ornament
Laser-cut wood snowflake card and ornament Copyright ©️ James R. Dunson 2018-2020.
Licensed under CC BY-NC-SA 4.0, with specific additional permissions granted to Hacksburg to use for fundraising. To view a copy of this license, visit https://creativecommons.org/licenses/by-nc-sa/4.0
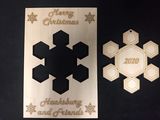
New 2020 snowflake design. The bottom "Hacksburg and Friends" text would be replaced with the user-specified custom name or message. Card and ornament fits in most standard 4" x 6" envelopes; additional postage may be required (e.g. surcharge for "rigid" mail pieces).
Laser-Cut Felt Gingerbread Person or Reindeer Ornament Kit
Laser-cut felt Gingerbread Person or Reindeer ornament Copyright ©️ James R. Dunson 2018-2020.
Licensed under CC BY-NC-SA 4.0, with specific additional permissions granted to Hacksburg to use for fundraising. To view a copy of this license, visit https://creativecommons.org/licenses/by-nc-sa/4.0
The typical 2020 Gingerbread Person / Reindeer kit includes:
- 2x laser-cut tan felt gingerbread person shapes, with lacing holes
- yarn for lacing (may have choice of colors, typically a matching tan and at least one contrast color)
- assorted laser-cut felt decor items in various colors
- safety plastic lacing needle
- craft sticks to aid in gluing and stuffing
- cotton balls for stuffing
- kid-safe, washable glue (may not be included in mailed kits; Tacky Glue or ordinary white school glue is recommended)
Basic instructions for either option:
- Set up a work space for gluing; with old cardboard, newspapers, wax paper, or something to avoid getting glue on the furniture
- Carefully separate out the various parts from the bag
- Place the two tan pieces on top of each other, lining up the holes
- (Note: they should be identical, and symmetrical, so it doesn't matter which way they go. In case they slightly vary, consider the larger one to be the "front".)
- Thread the yarn onto the needle.
- If using the Gingerbread Person option, place the "head" pointing upward; if using the Reindeer option, place the "head" pointing downward
- Starting at the topmost hole (top of head, or between legs/antlers), thread the yarn through both pieces; leave about 1.5" out the top to help form a hanging loop in the end.
- Lace (or "stitch") down one side of the head, one arm, one leg, then a bit over halfway around the other leg
- Take a cotton ball, and unroll it to be more of a strip, and/or pull it into smaller bits
- Use the craft stick to tuck the cotton between the pieces to stuff the ornament, starting with the limbs
- Repeat with additional cotton balls until desired stuffed look is achieved. This is typically 5-7 balls worth; you will typically have a bit extra.
- Finish lacing up the remaining side, and then go through the topmost hole again on the last stitch
- Tie a knot at the top
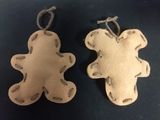
- Using the excess yarn, form a hanging loop, and tie a knot to finish it off. Trim any excess yarn.
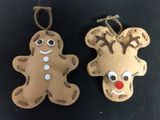
- Decorate by gluing on the various colors and shapes of laser-cut felt as you see fit. See the picture below for ideas. You may want to lay out your design to test it out before gluing.
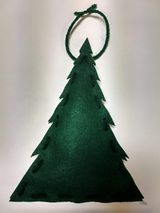
Laser-Cut Felt Christmas Tree Ornament Kit
Laser-cut felt Christmas Tree ornament Copyright ©️ James R. Dunson 2018-2020.
Licensed under CC BY-NC-SA 4.0, with specific additional permissions granted to Hacksburg to use for fundraising. To view a copy of this license, visit https://creativecommons.org/licenses/by-nc-sa/4.0
The typical 2020 Christmas Tree Felt Ornament kit includes:
- 2x laser-cut dark green felt tree shapes, with lacing holes
- dark green yarn for lacing
- assorted laser-cut felt decor items in various colors
- safety plastic lacing needle
- craft sticks to aid in gluing and stuffing
- cotton balls for stuffing
- kid-safe, washable glue (may not be included in mailed kits; Tacky Glue or ordinary white school glue is recommended)
Basic instructions for the default look, a decorated Christmas tree:
- Set up a work space for gluing; with old cardboard, newspapers, wax paper, or something to avoid getting glue on the furniture
- Carefully separate out the various parts from the bag
- Place the two tree pieces on top of each other, lining up the holes
- (Note: they should be identical, and symmetrical, so it doesn't matter which way they go. In case they slightly vary, consider the larger one to be the "front".)
- Thread the yarn onto the needle.
- Starting at the topmost hole, thread the yarn through both pieces; leave about 1.5" out the top to help form a hanging loop in the end.
- Lace (or "stitch") down one side and across the bottom of the tree, then about two holes up the other side
- Take a cotton ball, and unroll it to be more of a strip, and/or pull it into smaller bits
- Use the craft stick to tuck the cotton between the trees to stuff the ornament, starting with the furthest corner
- Repeat with additional cotton balls until desired stuffed look is achieved. This is typically 4-6 balls worth; you will typically have a bit extra.
- Finish lacing up the remaining side, and then go through the topmost hole again on the last stitch
- Tie a knot at the top
- Using the excess yarn, form a hanging loop, and tie a knot to finish it off. Trim any excess yarn.
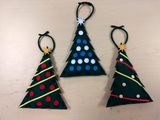
- Decorate by gluing on the various colors and shapes of laser-cut felt as you see fit. See the picture(s) below for ideas. You may want to lay out your design to test it out before gluing.
- (Note: pictured trees are from a previous year's kit, and may be decorated with different parts and/or colors than are available in the current kit.)
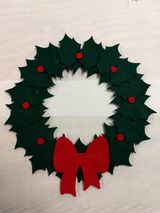
Laser-Cut Felt Wreath Kit
Laser-cut felt Wreath Copyright ©️ James R. Dunson 2018-2020.
Licensed under CC BY-NC-SA 4.0, with specific additional permissions granted to Hacksburg to use for fundraising. To view a copy of this license, visit https://creativecommons.org/licenses/by-nc-sa/4.0
The typical 2020 Wreath kit includes:
- 3x laser-cut green felt rings, with integral slot for wreath hangar
- at least 32x laser-cut green felt holly leaves
- at least 8x laser-cut red felt holly berries
- laser-cut red felt "bow" shape
- craft sticks to aid in gluing
- kid-safe, washable glue (may not be included in mailed kits; Tacky Glue or ordinary white school glue is recommended)
Basic instructions for the default look, a fairly symmetrical holly wreath:
- Set up a work space for gluing; with old cardboard, newspapers, wax paper, or something to avoid getting glue on the furniture
- Carefully separate out the various parts from the bag
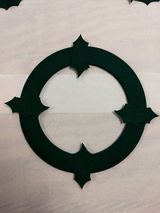
- Glue the 3 rings on top of each other to produce a 3-layer laminated ring, lining up the slot to match, and being generous with the glue.
- If using white glue, put a thin bead around just inside the inside and and outside edge of the ring, and then a zigzag of glue between them
- (Note: optionally, spray-type craft adhesive (not supplied) may be used to laminate the rings; follow instructions on can, with adult supervision and a well-ventilated working area required)
- (Consider the top with the slot to be "North" for purposes of the following directions)
- Take 4 leaves, and glue them on top of the ring, at N, S, E, W points, with the longer axis of the leaves pointing radially, and roughly centered on the ring. Make sure the N leaf is not glued in such a way as to cover the hanging slot.
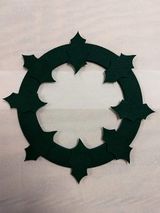
- Take 4 more leaves, and glue them on top of the ring in between the first set, at NE, NW, SE, SW points
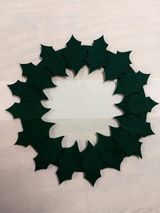
- Take 8 more leaves, and glue them on top of the ring in between the previous leaves. You should have mostly covered the ring with leaves at this point.
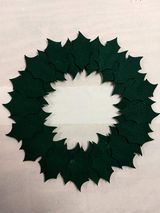
- Take 16 more leaves, and glue them on top of the previous leaves, in between. You may wish to offset them a bit to the outside.
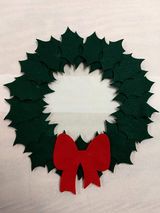
- Take the bow shape, and glue it on top of the leaves on the bottom (the "South" position), with the arms hanging below
- Take 7 berries, and glue them on top of the leaves at the N, NE, E, SE, SW, W, NW positions
